How to Build a School Timetable, Step by Step
How to build a school timetable in eight practical steps: periods, subjects, teachers and rooms, plus cover, closures and changes. Includes a worksheet to copy.

Key takeaways
- Build in a fixed order: the school day, then the hours each class needs, then the hardest constraints, then everything else.
- Place the scarcest resources first: part-time teachers, specialist rooms and shared staff.
- Keep the weekly pattern separate from the day-to-day changes, so a cover lesson never breaks next week's timetable.
Here is how to build a school timetable in the order that saves the most rework: fix the shape of the school day, work out how many periods each class needs, list every constraint, place the hardest pieces first, fill in the rest, check it from every angle, publish it, and then keep the weekly pattern separate from the day-to-day changes.
That is the whole method. The rest of this guide goes through each step with the details that tend to catch people out. It is written for heads of school, deputy heads and office managers who build or maintain the timetable, whether that is a primary school with ten classes, a secondary with shared specialist rooms, or a weekend school with three hours on a Saturday.
What do you need before you build a school timetable?
A timetable is only as good as the information behind it. Collect these before you open any grid or software:
- The list of classes or groups for next year, with expected sizes
- The curriculum plan: which subjects each class takes and for how many periods a week
- Every teacher, with the subjects they can teach and the days and times they are available
- Every room, with its capacity and anything special about it (science lab, gym, computer room)
- Fixed events: assemblies, prayer times, lunch sittings, swimming slots at the local pool
- The school calendar: term dates, holidays and known closures
Part-time availability is the item most often missed. Ask every teacher to confirm it in writing, and ask again a month before the timetable goes live.
Step 1: Fix the shape of the school day
Decide the start and end times, the number of periods, their length and where the breaks fall. Give each period a name or number that everyone will use.
A clear grid for a simple primary day might look like this:
| Period | Time |
|---|---|
| 1 | 08:30 to 09:20 |
| 2 | 09:20 to 10:10 |
| Break | 10:10 to 10:30 |
| 3 | 10:30 to 11:20 |
| 4 | 11:20 to 12:10 |
| Lunch | 12:10 to 13:00 |
| 5 | 13:00 to 13:50 |
| 6 | 13:50 to 14:40 |
Check the day against the rules that apply to you before you go further. In England, the Department for Education expects state-funded mainstream schools to run a core school week of at least 32.5 hours, counted from morning registration to the end of the school day and including breaks (Length of the school week). In the Netherlands, primary pupils must receive at least 7,520 hours of teaching over eight years, and those are 60-minute hours, not lesson periods (Overzicht aantal uren onderwijstijd). A grid of 50-minute periods has to be converted before you can check it.
Once this is settled, do not change it halfway through building. Every change to the grid means redoing everything placed after it.
Step 2: Work out the periods each class needs
For each class, list every subject and the number of periods per week. Add them up and compare the total with the number of slots in your grid.
A worked example: a school with a 30 period week (six periods, five days) has a class that needs 8 periods of maths and language, 4 of science, 2 each of history, geography and PE, and 4 of other subjects. That totals 30. If the total comes to 31, you have a problem to solve now, on paper, not in July.
Also decide which lessons should be double periods (practical science, art, PE) and which should be spread across the week (languages usually work better as short, frequent lessons).
Step 3: Write down every constraint
Constraints are the rules the timetable must follow. Write them as a list and mark each one as hard (must be met) or soft (nice to have).
Hard constraints usually include:
- A teacher cannot be in two places at once.
- A room cannot hold two classes at once.
- Part-time teachers only teach on their working days.
- Specialist lessons need the specialist room.
- Fixed events stay where they are.
Soft constraints might include: no class has the same subject twice in one day, maths in the morning for younger classes, teachers get at least one non-teaching period a day.
Keep the soft list short. Every soft rule you add makes the hard ones harder to meet.
Step 4: Place the hardest pieces first
This is the step that makes or breaks the timetable. Place the lessons with the fewest possible slots first:
- Lessons taught by part-time or visiting teachers
- Lessons that need a scarce room, such as the only science lab or a shared hall
- Anything tied to an outside booking, such as swimming
- Teachers shared between several classes or sites
A teacher who works only Tuesdays and Thursdays has perhaps twelve possible slots. A full-time teacher has thirty. Place the Tuesday and Thursday teacher first and the full-time teacher will still fit around them. Do it the other way round and you will be unpicking lessons by midnight.
Step 5: Fill in the rest
Now place the remaining lessons, class by class. Work through the subjects that have the most periods first, because they are the hardest to spread evenly.
Keep a running tally for each class and each teacher. When a class reaches its required number of periods for a subject, stop placing that subject.
Step 6: Check it from every angle
A timetable that looks fine by class can be a disaster by teacher. Before you publish, print or view it three ways:
- By class: does each class have the right number of each subject? Are there any gaps?
- By teacher: any double bookings? Any teacher with six periods in a row and no break? Part-timers only on their days?
- By room: any double bookings? Is the lab used for lessons that do not need it?
Then ask two teachers who were not involved to look for mistakes. Fresh eyes catch things you stopped seeing a week ago.
Step 7: Publish it and turn it into real dates
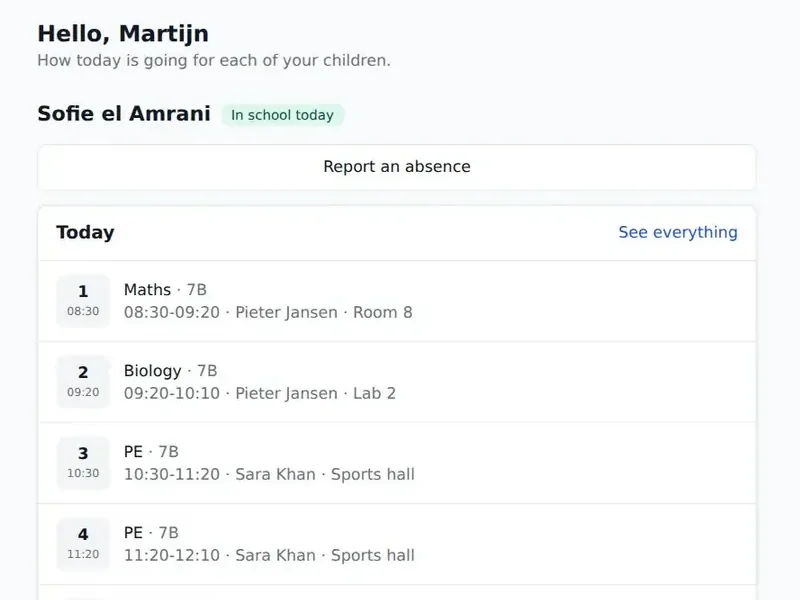
A timetable on a spreadsheet is a weekly pattern. What teachers, students and parents live with is real lessons on real dates: Tuesday 7 October, period 3, science, lab 2.
Enter the term dates, holidays and closures before you publish, so lessons do not appear on days the school is shut. In StudaHub, the repeating weekly timetable (periods, subjects, rooms and teachers) generates real dated lessons, and school closures and holidays are part of the calendar. Each role then sees what applies to them: teachers their own lessons, students and parents their class. See how the five roles differ.
Step 8: Handle cover and changes without breaking the pattern
No timetable survives the first week unchanged. Teachers are ill, a room floods, a trip takes a class out for a day.
The golden rule: a change to one lesson should change one lesson. If you edit the weekly pattern to record Tuesday's cover teacher, you will forget to change it back, and the wrong teacher will be listed for the rest of the term.
Keep a simple routine for changes:
- Record the change against the dated lesson only.
- Tell the people affected: the cover teacher, the class, and parents if the change matters to them.
- Keep a log of changes, so you can answer "who was teaching 8B on Tuesday?" in a month's time.
StudaHub handles this directly: a cancellation, a room swap or a cover teacher changes one lesson and leaves the pattern alone.
At the end of the year, start the new school year with a fresh pattern rather than overwriting the old one. In StudaHub, a new school year can be started, and undone if it was started by mistake, which happens more often than anyone admits.
A timetable worksheet to copy
Use this checklist each year when you build a school timetable:
- School day grid fixed: periods, times, breaks
- Class list for next year confirmed
- Periods per subject per class listed and totalled
- Totals match the number of slots in the grid
- Teacher availability confirmed in writing
- Room list with capacities and special uses
- Fixed events placed first
- Hard and soft constraints written down
- Part-time teachers and scarce rooms placed before everything else
- Checked by class, by teacher and by room
- Reviewed by two colleagues
- Term dates, holidays and closures entered
- Published to staff, students and parents
- Cover and change routine agreed with the office
Where to start
If you are wondering how to build a school timetable for the first time, start with steps 1 and 2 on paper this week. Getting the grid and the period totals right removes most of the pain later.
Building a school timetable is a puzzle, but it is a puzzle with a known order. Fix the day, count the periods, place the hardest pieces first and protect the weekly pattern from daily changes. If you are also changing systems this year, our guide to switching school management software helps you plan around the timetable. And if you want to see a weekly pattern turn into dated lessons, take a look at StudaHub: the first 3 months are half price.
If you would rather build it on screen, StudaHub's school timetable software follows the same order: periods first, then subjects, teachers and rooms, then the week.
Frequently asked questions
What is the first step in building a school timetable?
Start with the shape of the school day: start and end times, the number and length of periods, and the breaks. Everything else is placed into that grid. Then work out how many periods each class needs of each subject per week before you place a single lesson.
How long does it take to build a school timetable?
It depends on the size of the school and how many constraints you have. A small primary or weekend school can be done in a day or two. A larger school with part-time staff and shared specialist rooms usually needs several weeks, so start in the spring for a September timetable.
How do you handle cover and room changes in a timetable?
Treat them as changes to one dated lesson, not changes to the weekly pattern. Record the cover teacher or new room for that lesson only, so next week's lesson stays as planned. Keep a record of changes so the office can answer questions from teachers and parents.
When should a school start building next year's timetable?
Start in spring for a September start. You need time to confirm staffing, rooms and subject hours, build a draft, find the clashes and share it with staff before the summer. A weekend or supplementary school with a few groups can do it in a few weeks, but should still finish before enrolment closes.
Who should build the school timetable?
One person should own it, usually a deputy head or office manager, with input from heads of department on subject hours and staff on availability. One owner keeps the decisions consistent. Share the draft early and collect corrections in one place rather than in a dozen separate conversations.